You need to add a simple code to your blog template. If you are using a custom template, make sure you have access to the css code. And always backup your original Blogger template, before making the changes.
Follow these steps to add a ‘Big First Letter in Your Blog Post’:
Log in to your Blogger.Com account.
Go to the ‘Template‘ tab of your blog and click ‘Edit HTML‘.
Backup your existing template by clicking ‘Download Full Template‘ link.
Look your template codes in the ‘Edit Template‘ section and find the following code:
.post img {
or
.post-body img {
In Firefox, you can find it easily by pressing Ctrl+F and putting the code in the ‘find box’.
This code may have two to three lines with padding, border etc. Look for the end of this code. It ends with a } symbol. And add the following code below that symbol:
.post t { float:left; color: $headerBgColor; font-size:100px; line-height:80px; padding-top:1px; padding-right:5px; }
or
.post-body t { float:left; color: $headerBgColor; font-size:100px; line-height:80px; padding-top:1px; padding-right:5px; }
You can change the values of color, font-size etc. to suit your blog. (example: color:#FF0099)
Now save your template by pressing the ‘Save Template‘ button.
It is almost done. From now on, you need to put the first letter of your blog post inside the <t></t> tags. Mind it, it should be done in ‘Edit Html’ view of your blog editor. It will show a big first letter in your blog post.
To make it easier, you can add <t></t> in your post template. Go to Blogger Settings> Formatting and insert <t></t> in the Post Template and save the settings.
That’s it! Go and create a new post in blogger. You will see <t></t> in the HTML view of the post editor. Simply place the first letter of your blog post within the <t></t> tags and continue writing as usual. Publish your post and you will see a beautiful ‘big first letter’ in your blog post.

Step 1: Find the code below
</head>.
Step 2: Pase the code before the above one.
<script src='http://quiterandom.com/js/summary/summary-posts.js' type='text/javascript'/>
<script type='text/javascript'>
var thumbnail_mode = "float" ;
summary_noimg = 250;
summary_img = 250;
img_thumb_height = 120;
img_thumb_width = 120;
</script>
Step 3: Replace red colored text with your direct file link
Step 4: Find the following code again
<data:post.body/>
Step 5: Repalce the above code with below
<b:if cond='data:blog.pageType != "item"'>
<div expr:id='"summary-" + data:post.id'><data:post.body/></div>
<script type='text/javascript'>createSummaryAndThumb("summary-<data:post.id/>");</script>
<a class='readmore' expr:href='data:post.url'>Read more »</a>
</b:if>
<b:if cond='data:blog.pageType == "item"'><data:post.body/></b:if>
Step 6: Save the template
Step 7: Download The five From the following link
Creating first blog with blogger.com is quite simple and easy to make your first blog. But You will need gmail id first to deal with any google's product. However, if you are new in this business if you know what i mean, then you will need some asists to make it happen. So, here are some tips and steps waiting to be followed.
So good luck you have jusy created your first blog and now you will pay attention for next 2 weeks and make your site like this one.
- Go To Layout >> Edit HTML >> Click Expand all widgets
- Find the following code
- <data:post.body/>
- Place the following code code right before the above code <div style="float:left;padding:5px;">
- Replace the red code wiyh your encode ads
- Save it
encoded adsense ad code here
</div>
Today I will place yahoo smilies right above the post a comment. So that it will help to make any empressionby using pictures. If you see the picture below and it will be like that. So if you want to try this with me then
Follow my steps
Long in your blogger account- Go to Layout then Edit HTML
- Find the following code
- Now I will Add the below code after the above code
- After that, I will find the following code
- Then I will place the below code before the above code
- Save it For now
- Now you will need a smiley.js so here is the link down load it and upload it to your hosting site then change the red colored link.
- That's It!
<b:if cond='data:post.embedCommentForm'>
<div style='-moz-background-clip: -moz-initial; -moz-background-origin: -moz-initial; -moz-background-inline-policy: -moz-initial; width: 369; text-align: left; border: 1px solid #cccccc; padding: 5px; background: #eeeddf; height:86'>
<b>
<img border='0' height='18' src='http://us.i1.yimg.com/us.yimg.com/i/mesg/emoticons7/21.gif' width='18'/> :))
<img border='0' height='18' src='http://us.i1.yimg.com/us.yimg.com/i/mesg/emoticons7/71.gif' width='18'/> ;))
<img border='0' height='18' src='http://us.i1.yimg.com/us.yimg.com/i/mesg/emoticons7/5.gif' width='18'/> ;;)
<img border='0' height='18' src='http://us.i1.yimg.com/us.yimg.com/i/mesg/emoticons7/4.gif' width='18'/> :D
<img border='0' height='18' src='http://us.i1.yimg.com/us.yimg.com/i/mesg/emoticons7/3.gif' width='18'/> ;)
<img border='0' height='18' src='http://us.i1.yimg.com/us.yimg.com/i/mesg/emoticons7/10.gif' width='18'/> :p
<img border='0' height='18' src='http://us.i1.yimg.com/us.yimg.com/i/mesg/emoticons7/20.gif' width='22'/> :((
<img border='0' height='18' src='http://us.i1.yimg.com/us.yimg.com/i/mesg/emoticons7/1.gif' width='18'/> :)
<img border='0' height='18' src='http://us.i1.yimg.com/us.yimg.com/i/mesg/emoticons7/2.gif' width='18'/> :(
<img border='0' height='18' src='http://us.i1.yimg.com/us.yimg.com/i/mesg/emoticons7/8.gif' width='18'/> :X
<img border='0' height='18' src='http://us.i1.yimg.com/us.yimg.com/i/mesg/emoticons7/12.gif' width='18'/> =((
<img border='0' height='18' src='http://us.i1.yimg.com/us.yimg.com/i/mesg/emoticons7/13.gif' width='18'/> :-o
<img border='0' height='18' src='http://us.i1.yimg.com/us.yimg.com/i/mesg/emoticons7/7.gif' width='20'/> :-/
<img border='0' height='18' src='http://us.i1.yimg.com/us.yimg.com/i/mesg/emoticons7/11.gif' width='18'/> :-*
<img border='0' height='18' src='http://us.i1.yimg.com/us.yimg.com/i/mesg/emoticons7/22.gif' width='18'/> :|
<img border='0' height='18' src='http://us.i1.yimg.com/us.yimg.com/i/mesg/emoticons7/35.gif' width='24'/> 8-}
<img border='0' height='18' src='http://us.i1.yimg.com/us.yimg.com/i/mesg/emoticons7/100.gif' width='31'/> :)]
<img border='0' height='18' src='http://us.i1.yimg.com/us.yimg.com/i/mesg/emoticons7/102.gif' width='44'/> ~x(
<img border='0' height='18' src='http://us.i1.yimg.com/us.yimg.com/i/mesg/emoticons7/104.gif' width='30'/> :-t
<img border='0' height='18' src='http://us.i1.yimg.com/us.yimg.com/i/mesg/emoticons7/66.gif' width='18'/> b-(
<img border='0' height='18' src='http://us.i1.yimg.com/us.yimg.com/i/mesg/emoticons7/62.gif' width='18'/> :-L
<img border='0' height='18' src='http://us.i1.yimg.com/us.yimg.com/i/mesg/emoticons7/14.gif' width='34'/> x(
<img border='0' height='18' src='http://us.i1.yimg.com/us.yimg.com/i/mesg/emoticons7/24.gif' width='30'/> =))
</b>
</div>
</body>
<script src='http://Your Direct link here/smiley.js' type='text/javascript'/><noscript><a href="http://bloggerstop.net" target="_blank"><span style="font-size: x-small;">Add Smilies</span></a></noscript>
Create and customize an animated banner that cycles through your feed's five most recent items. It's an easy way to promote your content anywhere you can place a snippet of HTML.
If you want to place it in your blog then follow the steps i tell you
1. Go to your feedburner page and log in your account
2. Then go to Publicize tab
3. Click "Headline Animator" from the felt navigetor
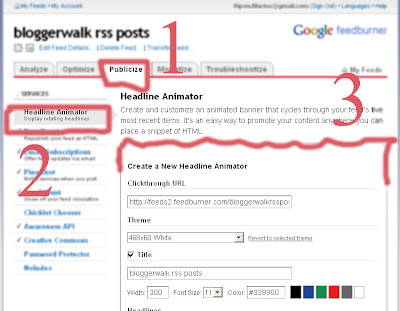
4. Customize it with using the number of fields
5. Save to activate the service.
6. In the next page You will select your blog type for exaple if you use blogger then choose it then click next. and it will be automatically placed in your blog.
If you want to place it in your blog then follow the steps i tell you
1. Go to your feedburner page and log in your account
2. Then go to Publicize tab
3. Click "Creative Commons" from the felt navigetor

4. Customize it according your wish
5. Click Save to activate
Promote your FeedBurner feed directly on your website! Place HTML that Chicklet Chooser automatically generates for you in your site templates to help users easily subscribe to your feed. see the bolow as an example
If you want to place it in your blog then follow the steps i tell you
1. Go to your feedburner page and log in your account
2. Then go to Publicize tab
3. Click "Chicklet Chooser" from the felt navigetor
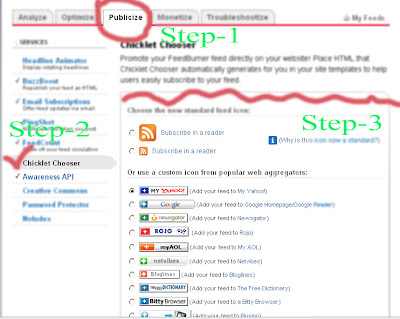
4. Choose the new standard feed icon from the list
5. Copy the HTML code for use in your own page templates Or you can directly place this code from here.
The Awareness API allows developers to build applications that can display, analyze and promote your feed's traffic data outside of FeedBurner. Awareness API access for your feed is disabled by default, but you can toggle its activation status here. (Want to build applications that hook into the Awareness API? Full documentation is available.)
1. Go to feedburner log is your account.
2. Then go to Publicize tab
3. Click Awareness API from the felt navigetor
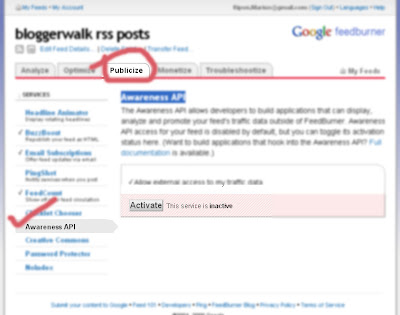
4. Click Activate
FeedCount is another cool way to promote your feed. It is a dynamic graphic that always displays your feed's current circulation, as calculated by FeedBurner. Choose its color scheme and an animated or static appearance; it is yours to customize!feednurner then log in you gmail account. here is an example
1. Go to Your feedburner account
2. Then click Publicize tab
3. Now Click FeedCount from the left navigator bar
4. Select your Chicklet style
5.Click Activate to get the code.
6. Now you will place the code in your blog by selecting HTML/Java Script gadget
1. Go to feedburner log is your account.
2. Then go to Publicize tab
3. Click Email Subscriptions from the felt nevigetor
4. Now you customize the forms and copy the code but remeber if you use blogger then select "Use as a widget in blogger"
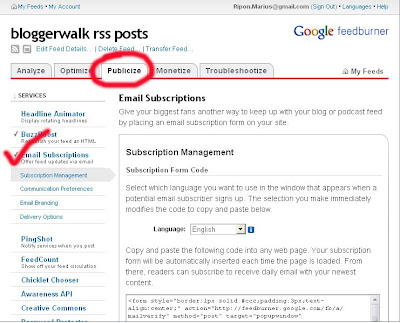
5. Copy the code then place it in HTML/JAVA gadget
6. Save the gadget.
Now If you want to place it in every single post but not is the home page then follow the steps
6. goto blogger account >> Layout >> Edit HTML click expand widgets
7. Search the below code by Ctrl + F
<data:post.body/>
8. Place the code after the above code with
<b:if cond='data:blog.pageType == "item"'>
<table border='0' cellpadding='0' cellspacing='0' width='100%'>
<tr>
<td><div align='center'><form action='http://feedburner.google.com/fb/a/mailverify' method='post' onsubmit='window.open('http://feedburner.google.com/fb/a/mailverify?uri=bloggerwalkrssposts', 'popupwindow', 'scrollbars=yes,width=550,height=520');return true' style='border:1px solid #ccc;padding:3px;text-align:center;' target='popupwindow'><p>Enter your email address:</p><p><input name='email' size='80' style='width:140px' type='text'/>
</p><input name='uri' type='hidden' value='bloggerwalkrssposts'/><input name='loc' type='hidden' value='en_US'/><input type='submit' value='Subscribe'/><p>Delivered by <a href='http://feedburner.google.com' target='_blank'>FeedBurner</a></p></form></div></td>
</tr>
</table></b:if>
9. Save it

Anyway if you want to change your existing domain then follow the steps
1. Log in your account
2.Then go to Sitting
3. click on publish tab
4. Input your desired text in the first field
My blog template doesnt have any bootom section so i am now about to place three column at the blog bottom place. So the steps are as folow
1. Log in blogger account
2. Go to layout then edit HTML
3. Now (Ctrl + F) Search for below codes,
<div id='footer-wrapper'>
<b:section class='footer' id='footer'/>
</div>
4. The we need to replace the red line with the following code,
<div id='footer-column-container'>
<div id='footer2' style='width: 30%; float: left; margin:0; text-align: left;'>
<b:section class='footer-column' id='col1' preferred='yes' style='float:left;'/>
</div>
<div id='footer3' style='width: 40%; float: left; margin:0; text-align: left;'>
<b:section class='footer-column' id='col2' preferred='yes' style='float:left;'/>
</div>
<div id='footer4' style='width: 30%; float: right; margin:0; text-align: left;'>
<b:section class='footer-column' id='col3' preferred='yes' style='float:right;'/>
</div>
<div style='clear:both;'/>
<div id='footer-bottom' style='text-align: center; padding: 10px; text-transform: lowercase;'>
<b:section class='footer' id='col-bottom' preferred='yes'>
<b:widget id='Text2' locked='false' title='' type='Text'/>
</b:section>
</div>
<div style='clear:both;'/>
</div>
5. Find </b:skin> and place the below codes before it
#footer-column-container {
clear:both;
}
.footer-column {
padding: 10px;
}
6. And save Your Template.
Now Go to Page elements you can see three column created in your footer above your main footer.

Today i just placed Flash animated tags in this blog and here is summary of the procedure of placing this tag in your blog and i belive you can do that. its quite easy. just follow the steps
It may not suitable for all XML template so read detail about the template before downloading it.
1. Log in your blogger account
2. Then go to Layout
3. Then click edit HTML but dont click expand widget mode
4. Find the following code by ctrl + F
<b:section class='sidebar' id='sidebar' preferred='yes'>
5. Now Place the below codes after the above line
<b:widget id='Label99' locked='false' title='Labels' type='Label'>
<b:includable id='main'>
<b:if cond='data:title'>
<h2><data:title/></h2>
</b:if>
<div class='widget-content'>
<object type="application/x-shockwave-flash" data="http://halotemplates.s3.amazonaws.com/wp-cumulus-example/tagcloud.swf" width="250" height="200" allowscriptaccess="always" >
<param name="movie" value="http://halotemplates.s3.amazonaws.com/wp-cumulus-example/tagcloud.swf" />
<param name="bgcolor" value="#ffffff" />
<param name="flashvars" value="tcolor=0x000000&mode=tags&
amp;distr=true&tspeed=100&tagcloud=<tags>
<b:loop values='data:labels' var='label'>
<a expr:dir='data:blog.languageDirection' expr:href='data:label.url' style='12'><data:label.name/></a>
</b:loop>
</tags>" />
<p>Blogumulus by <a href='http://www.roytanck.com/'>Roy Tanck</a> and <a href='http://www.bloggerbuster.com'>Amanda Fazani</a></p>
</object>
</div>
<b:include name='quickedit'/>
</b:includable>
</b:widget>
6. Now preview the blog before saving it. If you know some basic html code then you may change its color text and so on.
1. Click here to see the image and download it then upload it to any direct file upload website such as photobucket.com
2. Log in your blogger account then layout >> edit HTML
3. Search by Ctrl+F then write blockquote
blockquote {4. Replace all the code within { } to
.....................
}
blockquote {5. After that you will paste this code right after the above one
border-top: 1px solid #FFF;
border-left: 1px solid #FFF;
border-right: 1px solid #666666;
border-bottom: 1px solid #666666;
background: #D1D0C6 url(http://Your-image-directory/quote.gif);
background-position:top left;
background-repeat:repeat-y;
margin: 0 20px;
padding: 10px 20px 10px 45px;
font-size: 0.9em;
}
code {
color: #000000;
font-size: 110%;
}
That would be all for this section. If you know some code then you can change the entire outlook of your Block Quote. Happy humping
Please folow the steps
1. Go to youtube website then search your vedio which is perfect match for your blog.
2. Copy the embed code from youtube website. You can costomise the flash from this website.
3. Then log in you blogger account >> Layout Tab >> Add a gadget. Chosse HTML/JAvaScript.
4. Paste the code in here. Save it.
Youtube embed code is
<object width="480" height="295"><param name="movie" value="http://www.youtube.com/v/vfdoLBni4zA&hl=en&fs=1"></param><param name="allowFullScreen" value="true"></param><param name="allowscriptaccess" value="always"></param><embed src="http://www.youtube.com/v/vfdoLBni4zA&hl=en&fs=1" type="application/x-shockwave-flash" allowscriptaccess="always" allowfullscreen="true" width="320" height="270"></embed></object>The red colored text indicates your vedio link and blue is the measurment or size of your flash vedio. you can edit you size and vedio any time you want.
My first job is to find out a perfect template from the website for my blog. So i used my favorite blog site Blobberstyle.com and from here i have choose the following template
 .
.Please folow the steps
1. Download your template from the freee website for example http:///bloggerstyles.com but remember if you choose a template like this one then you have to follow somes instructions which is given in the zip file.
2. Log in your blogger accoount then go to layout section and expand your choice to edit html. From here, you can download your full existing template if you want.
3. Browse your file and click upload. A confirmation will appear but you have to click delete confirm option.


